BEAUTY DIY: HOW TO TURN LOOSE PIGMENTS / POWDERS INTO SOLID PRESSED POWDER

I have quite a few eyeshadow pigments that are beautiful but I just never use them because they’re so messy and far more time consuming to use because of this (unless you want loose pigment all over your face, in which case just slap that bad boy on and go…). If you’re the same then this picture should get you a little bit over excited: Loose Pigment to Pressed Powder

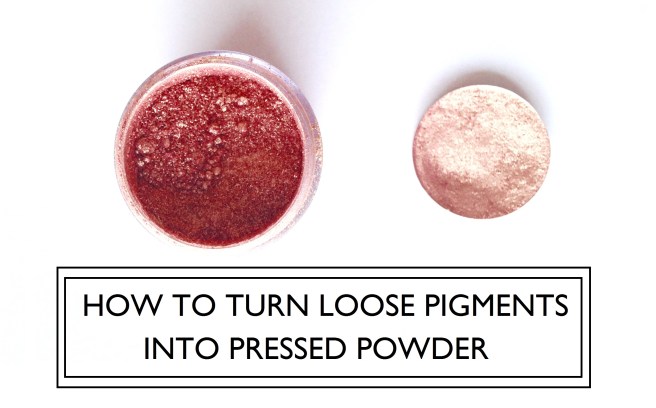
This little DIY means that I can transform my loose pigments into solids, and now these beauties are actually getting used (and I’ve discovered a new favourite eyeshadow shade in the process). It’s so quick and easy that you’ll wonder why you haven’t done this before.

WHAT YOU NEED:
Empty eyeshadow / powder pans (I used this)
Rubbing alcohol (I used this)
Cocktail sticks (or cottons buds / Q-Tips with the cotton wool removed)
Cling film / tissues
Coins Items Required

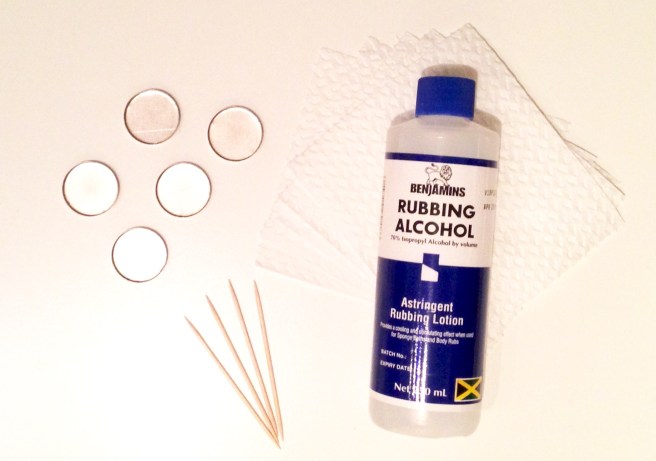
WHAT YOU NEED TO DO:
STEP ONE: Pour some of your loose pigment / powder into the empty pan. Now carefully add some alcohol in to mix with the eyeshadow. I usually start by adding just a few drops, you can always add more later.  You just want it to be damp enough where you can stir it together and smooth it out. (I prefer not to fill the entire pan as it takes a really long time to dry so I  fill it halfway up, let it dry and then add a second “layer” to the pan.)

STEP TWO: Use a cocktail stick to stir the powder and alcohol together and then use your finger to smooth it out (you could use the back of a spoon if you don’t want to get your hands dirty…)

STEP THREE: Leave it dry for about an hour (this obviously depends on how much product you filled your pan with. If it is dry enough that you get powder when you run your finger over it then you’re good to go…) and then lay a piece of cling film or tissue over it and stack some coins on top, I find 2p pieces work well for eyeshadow pans, to “press” it down.  This helps compact the shadow making it more solid and less likely to give you excess product when you come to use it. Leave it overnight and boom! You’re done and have your pressed eyeshadow ready to use.

You could do this with any other powders –  next up, I’m going to get myself an empty blush palette and do the same with my loose face powders – they’ll get used far more often and be so much easier to travel with.  (This method would also work for fixing broken / smashed up powder compacts.)

Easy peasy, right?


DRESSING ROOM PROGRESS

I feel like the title of this post really should have been ‘Dressing Room Progress???’. I keep reminding myself that you have to make things worse before you make them better when it comes to DIY.

Before I show you the ugly before and destruction pictures, I thought seeing a floor plan of how I intend to layout the wardrobes and furniture in the room might help give a clearer idea of the size of the space and how much I’m hoping to cram in – it’s so difficult to take pictures of the room because of it’s petite size. Dressing Room Floor Plan

This weekend I made the trip to Ikea and purchased a MALM dressing table and PAX wardrobe. I already had a 50cm wide, 58cm deep PAX from my pre-move bedroom but picked up the 75cm deep PAX; playing a fun game I like to call “How Much Ikea Furniture Can You Fit In A Ford Fiesta”. I’ll need to make a mid-week visit to pick up the remaining 35cm deep PAX wardrobes and a Billy bookcase, which will become my shoe closet.

So, here’s what the dressing room looked like before destruction started… Dressing Room Before Dressing Room Before

Those pictures are dreadful but it’s such a tiny space it’s pretty much impossible to get the whole room in. This shot of the floor, taken with me squeezing myself against the wall in a corner, gives a good idea of just how small it is (ignore the tape on the floor, that’s for marking out where wardrobes will go.) Dressing room floor

The old coving was ripped out as it was in pretty bad shape along with the horrible, yellowing old plastic curtain rail and skirting boards. As I said in my dressing room inspiration / mood board post the Thibault Tanzania wallpaper was always a must for me and was something I ordered straight away. Luckily I only need one roll so it’s not hurting my bank account too much. I managed to find the perfect paint at the Valspar counter at B&Q for the other three walls. Dairy Belle compliments the wallpaper without being too creamy against the all white Ikea furniture. Dairy Belle Valspar Paint

This progress picture shows how much lighter Dairy Belle is compared the pale yellow walls that were originally there – the room definitely feels a lot lighter now. Dressing Room painting in progress

Painting has been completed and wallpaper has went up this weekend.  New coving is currently drying (is that the even right term?) in place. Dressing room coving

The last thing that has changed in the dressing room is that last week the old radiator was replaced. The previous one was too high and would have meant that the dressing table wouldn’t have been flush against the wall so a gas/boiler/plumber dude (whatever the official job title is for the people who are actually qualified to mess about with things like this. I know my limits and there is no way I’m messing about with radiators!) replaced it with this smaller one, which is also more energy efficient, whilst a few other radiators were being replaced and the central heating system was being flushed out. #glamourtimes. The radiator was around £25 from B&Q and the guy didn’t actually charge us anything extra for the labour as he was already here doing work. It might sound silly to change the radiator but in such a small room every centimetre of space counts so for me this was a worthwhile spend. Baby radiator for the win… Replacement radiator

Anyway, no pretty progress pictures as yet, but at least the bulk of the “dirty” work has been completed now. Once the coving has dried it just needs caulking and painting and then I’m all set to start making organisational magic happen in there! After building a lot of IKEA flat pack furniture…

IKEA HAUL

Another weekend, another adventure in IKEA. As always I went for one thing and left with a bag full of goodies… IKEA HaulTop row:
RIBBA 40x50cm frame in oak effect, £7. Coming soon to a laundry room near you me.
PLUGGIS waste bin, £10. I’m going to use this to store all my lunchbox / tupperware type items in the hope I’ll no longer risk getting concussed every time I open that cupboard.
TILLSLUTA dry food containers, £5. For storing dry food. Obvs.

Middle row:
POKAL glasses, £0.50. Love these. Chunky and seem to have a certain ‘bounce-ability’ when you drop them on the floor…
FAGLEBODA handles in brass, £6. Actually bought two packs of these for an IKEA hack I’m planning on doing. Eventually…
FANTASTISK paper napkins, £1.25 & £0.70. Regular napkins and cocktail napkins. Because I’m messy.
DINERA bowls in grey-blue, £2 and £1.30. I bought two of each of these and, not gonna lie, it’s pretty much just because they’ll look pretty on the open shelving in my kitchen.

Bottom row:
OREHAMN bath caddy, £3. After Friday’s post about at-home pamper sessions featuring a bath caddy I couldn’t resist picking up this one, on sale for £3. Bargain!
SINNLIG scented candle, £2.50. Now I have no idea what this scent is, IKEA call it “calming spa” but I really like it. It’s the grey one, if that helps anyone work it out!
SINNERLIG bottles, £6 & £4.50. All the heart eyed emojis for the new SINNERLIG range, designed by Ilse Crawford. The plan is to use these bottles for spirits when I actually get around to creating myself a little bar cart area.

Not pictured:
KNAGGLIG boxes, £9. I bought another three of these. I use them everywhere and raved about them in my Ikea Must Have’s Under £10 post.

What have you been picking up in Ikea recently?

AND SO IT BEGINS…

DIY Tools

I’ve always enjoyed reading blogs, going back to the days when I had a LiveJournal account to share my every.tiny.little.thought with the world*.

*Probably just my mum…

Nowadays I’m more likely to be following design, DIY and beauty blogs on BlogLovin’; making my morning commute that much more enjoyable, plus enabling me to practice that great British tradition of never making eye contact with other people on public transport.

When I moved into a new house in need of more than a few updates, some cosmetic, some a little more full-on, this seemed the perfect time to start my own blog, if only so my mother can keep tabs on me in new and exciting ways!

So this little corner of the internet will be where I document my interior design and decorating adventures along with chatting about beauty, style, travel, cooking and whatever else is taking over my life that week.  As the ultimate procrastinator, surely some kind of online DIY diary will actually make me tackle that ever expanding ‘To Do’ list rather than spending hours pinning those perfect “inspiration” pictures on Pinterest?!

Let the blogging begin!

You can stay updated by following me on Twitter @boboandmimi, Instagram @boboandmimi and Facebook.